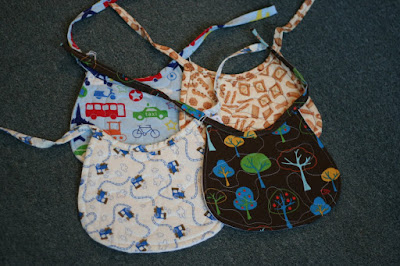
These quilted bibs are one of my favourite little gifts to whip up and give to friends and family, and although I concede that they may not be the most practical bibs around (not as wipe-clean as vinyl bibs) I'll argue that they are pretty darn cute - and those who have made use of them agree!
This simple tutorial can be altered to make terry cloth bibs, vinyl bibs, and more - or you can put your patchwork skills to use and create a patchwork front to the bib. In order to make the finishing as easy as possible, the bib is finished with tie much like that of a quilt binding; this hides your rough edges and gives a nice finish to the product.
You can make your own baby bibs really easily - pattern and all.
What you'll need
- cotton print fabric (for front and backing)
- wadding
- sewing machine, thread and accessories
- paper for making your pattern.
1. To make your pattern - simply fold a large piece of paper over and roughly draw a half bib shape with the fold along the vertical axis. (If you draw half your bib, and cut with paper folded, you'll guarantee yourself a perfectly symmetrical shape). You want to draw slightly over sized than your final product - as we'll sew with a 1/4 inch seam and lose 1/4 inch on most edges.
If pattern making stresses you out, just trace a bib you already have and add 1/4 inch all around.

2. Cut out one bib shape for each of your back fabric, wadding, and front, as well as a 26" long 2 inch wide strip which will make your tie.
3. Lay your front and back fabrics right sides together and then lay your wadding over top, so it is laid on the wrong side of the front piece.
4. Sew a 1/4 inch away from the edge, starting at one side of the neck, sewing along the curve of the bib towards the other side of the neck (leave the entire neck open for turning out).
5. Turn out your bib so that the wadding is sandwiched between the front and back pieces. Press your bib.
6. Sew 1/4 inch along from the finished edge of the bib, to finish and neaten the edges - and then freestyle quilt the interior with curves, star shapes or straight lines - whatever you are most comfortable doing. Be sure that you sewing lines start at finish at the rough edges of the bib's neck, backstitching to secure as you finish. This means no tying ends and all your messy finishing work will be covered by the tie.


7. Press the edges of your tie (binding) inwards as you would if you were making bias binding (folding each side into the middle, and then pressing in half again). So that you have a long strip with rough edges exposed at either end.

8. Lay out your binding and placing the bib in the centre of it, so that you tuck the rough edges into the fold of the binding with equal lengths which will form the tie on either sides. Pin the binding in place along the rough edge of the bib.
9. Starting at one end of the binding, tuck in the short raw edge in about 1/2 inch and then begin to sew along the length of the binding backstitching where you started following all the way until the other side, making sure you catch the rough edges of the bib as you go. As you approach the end of the binding, tuck in the raw edge, sew to the edge and backstitch.

10. Tie in any loose threads - and Ta Da! you have a gorgeous little bib!
Four of these little bibs will be auctioned off this week on e-bay as the first set of items which will hopefully raise money for Macmillan Cancer Support.
No comments:
Post a Comment